If your home was flooded during Hurricanes Helene, Milton, or even Ian a few years ago, you might be ready for a fresh start. Whether you’re thinking about converting ground-level rooms into parking and storage or planning a complete rebuild, it’s normal to feel a bit overwhelmed. The good news? Taking the right first steps can set you up for a successful project and a resilient, comfortable home. Here’s how we can get started together.
Step 1: Get a Recent Survey and Elevation Certificate
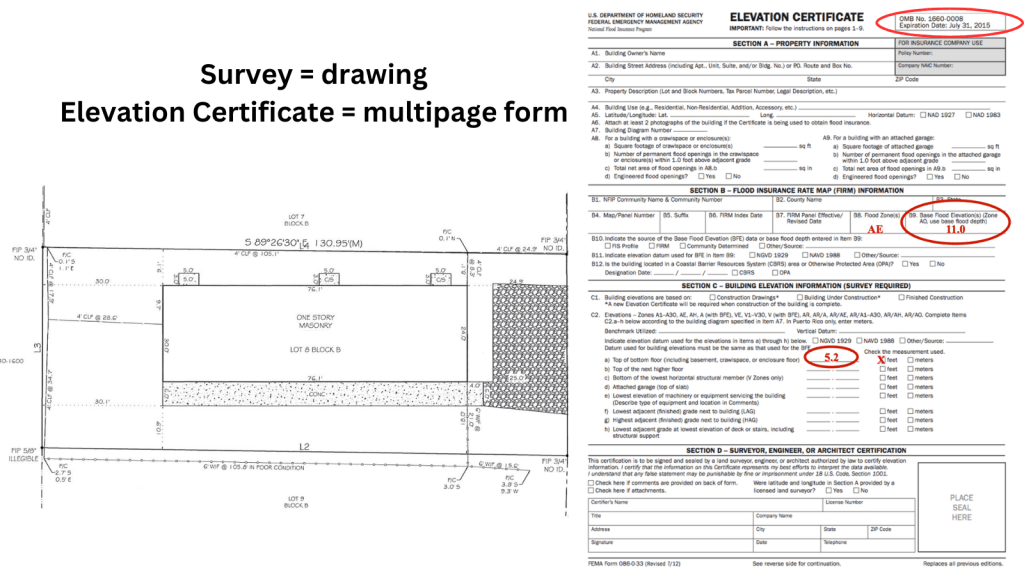
Before diving into design, having a current survey and an Elevation Certificate for your property is essential. Here’s how they help:
Updating an Existing Survey: If you have a survey from a past project, contact the original surveyor and let them know this survey will be used for remodeling or new construction. If it was created digitally, they can usually pull up the file, visit your property to verify and remeasure, and update the survey for current use. This visit will include checking and adding any new features, like sheds, pools, docks, and other structures that need to be on record.
Getting a New Survey: If you don’t have a survey or if the property has seen a lot of changes, it’s best to start fresh with a new one. Again, make sure to specify that the survey is for remodeling or a new build. This way, the surveyor includes details required by the building department, such as impervious surface calculations or elevation markers.
Request an Elevation Certificate: Always ask your surveyor to include an Elevation Certificate. This official form tells us which flood zone you’re in and compares the current floor height of your home to the base flood elevation (BFE) for your area. This information is crucial for planning the height of your new addition or raised living spaces to comply with flood regulations.
Architect’s Tip: It’s a good idea to request a CAD file of the survey along with the paper or PDF version. This CAD file serves as a base for our site plan and floor plans, saving time and ensuring everything aligns accurately from the start.
Step 2: Schedule Geotechnical Testing
For many coastal or barrier island properties, a geotechnical report is essential. Soil composition in these areas can be unpredictable—from stable, compacted sand to patches of debris that require extra foundation support.
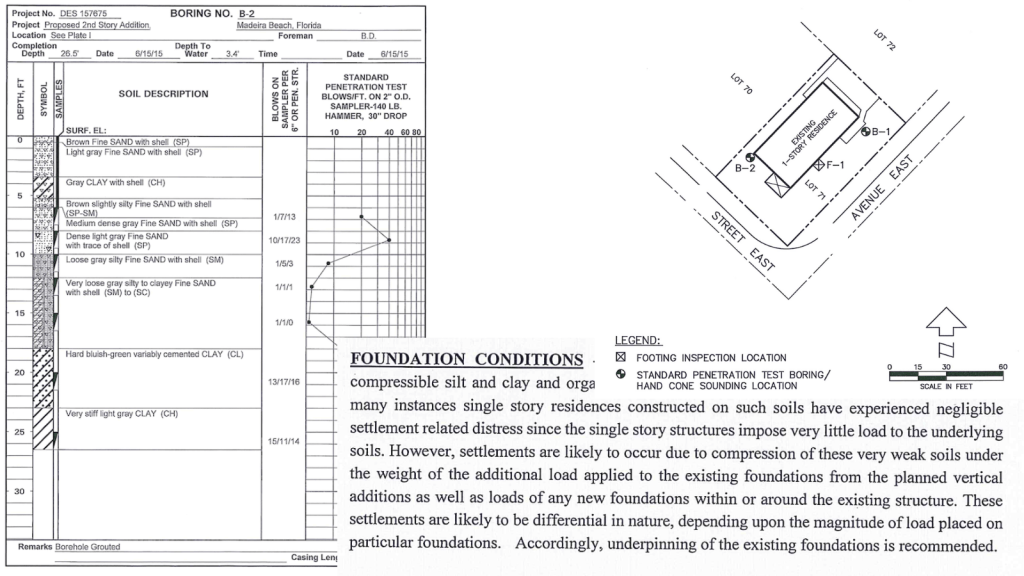
Why It’s Important: A geotechnical engineer will test the soil’s stability in specific locations where the addition or new structure will go. This usually involves drilling at various points around the property to analyze what’s beneath—sand, clay, muck, or sometimes buried debris from previous construction.
Foundation Recommendations: Depending on what they find, the engineer will recommend the type of foundation that’s best for your home. If the soil is stable, a standard footing may work. If there’s loose or unstable material, they might suggest deeper piles or wider footings. These foundation recommendations are a critical part of planning for stability and longevity, and both new and existing foundations can be adapted to these recommendations.
Local Insight: Experienced geotechnical engineers are familiar with common soil conditions in our area. Their local expertise can give us a clearer picture of what to expect and can often save time in planning.
Ready to Begin?
Starting with the right preparation can make all the difference. If you’re ready to explore options for rebuilding or remodeling, I’d love to help. Together, we’ll ensure your new home is built for resilience and designed with peace of mind.
And remember, you can take care of the survey before hiring an architect. It’s often helpful to have it on hand for our first conversation, so we’re ready to start with accurate information. However, we typically recommend holding off on the geotechnical report until we can meet and decide together where your addition or new home will sit on the property.