
In architectural design, success often hinges on the foundation laid during the pre-design phase. This critical stage sets the tone for the entire project, guiding architects, and Homeowners through the initial stages of planning and conceptualization. Central to this process is the Architectural Pre-Design Phase, an endeavor aimed at gathering crucial data and insights to inform subsequent design decisions. Let’s delve into the key components of this indispensable stage:
- Understanding Building & Zoning Requirements: The first pillar of the Architectural Pre-Design Phase involves a deep dive into the intricate web of building codes and zoning regulations. Architects meticulously scour through local ordinances, building regulations, and zoning restrictions to ensure compliance and viability of the proposed project. Factors such as setback requirements, maximum building height, parking regulations, and land use restrictions must be carefully considered to lay the groundwork for a successful design.
- Sometimes, when designing an addition or remodel, we find that the existing house doesn’t conform to current zoning restrictions. If the house (or previous additions) was built with a permit, this is usually seen as non-conforming. However, the new addition must still follow the setbacks or height requirements.
- Not all zoning ordinances are created the same! We often come across regulations that were written over 50 years ago and have not been updated, or the local authority has to provide interpretations for words that are not clearly defined. Examples include pool cabanas (with or without outdoor kitchens and bathrooms), detached garage workshops (are they really sheds?), and the maximum height of a building in a flood zone.
- Converting a garage into a living area may trigger the parking requirement. In many places, 2 parking spaces must fit inside the property lines. On some properties, there just isn’t enough space without using the garage.
- A survey is required before we can start the design. We often find that fences don’t follow property lines exactly, and there may be Utility Easements on part of your property, too. Although the survey that was original to the house is a good start, many Building Departments will require more information than is shown on that. We will research and let you know if the survey needs to have the trees located, concrete driveways and walkways measured, or the topographic spot elevations shown. Sometimes a survey needs to be less than one year old at permitting, so your Surveyor may need to re-certify the survey, too. Your Surveyor will come out to measure, and will later provide you with a signed and sealed PDF of the results. For our purposes, you can also ask them to send a CAD file to us.
- Compiling the “Wish List” and Establishing a Budget: Armed with a thorough understanding of regulatory constraints, architects collaborate closely with clients to outline their vision for the project. This involves compiling a comprehensive “Wish List” of desired functions, spaces, and amenities. From the number of bedrooms to the ideal pool party setup, every aspect is meticulously documented. Additionally, establishing an estimated budget and square footage or size of rooms serves as a crucial framework within which the design will unfold, ensuring alignment with the client’s financial and spatial constraints.
- Not just having a “Wish List”, but prioritizing the listed items is important. Read our other blog articles for more information on your “Wish List”. Click here to read Your Remodeling Journey: Balancing Needs vs Wants.
- Using basic cost information from previous projects, we use your budget to help figure out how big your addition or remodeling area can be. Budget divided by Cost per square foot = Approximate size.
- Assessing Existing Conditions: Before embarking on the design journey, architects undertake a detailed examination of the existing site and structures, if applicable. This involves on-site visits to measure and photograph the existing building, capturing its spatial layout, structural elements, and contextual nuances. By gaining a comprehensive understanding of the site’s existing conditions, architects can better integrate the new design with its surroundings, optimize spatial utilization, and identify potential challenges or opportunities.
- We have recently started Scanning homes by using the camera + LiDAR function on our iPad. This takes about the same time as it did when we just used a tape measure, but it saves a lot of time later when we draw up the existing house. It also means we have continuous photos to refer back to instead of visiting your house again to double-check things.
- It’s also important for us to check how the existing house was built (and any subsequent additions), find any issues or hidden areas that might change the design, and match the size and height of the windows or siding. We also walk around the property looking for trees too close to the house, low or wet spots in the yard, and the locations of overhead wires. Neighboring houses with large windows overlooking your yard are documented, as are views you may want to see or want to avoid from your home!
- Harnessing Technology: In the digital age, Computer-Aided Design (CAD) software stands as a cornerstone of architectural practice, facilitating precision, efficiency, and collaboration. In fact, we have used 3D software for over 20 years, which allows us to share 3D images with our Clients all through the design process. During the Architectural Pre-Design Phase, architects input crucial data gathered from surveys, elevation certificates, scanning, measurements, and photographs into CAD software. This digital framework serves as the canvas upon which the design will evolve, allowing architects to explore various iterations, test design hypotheses, and communicate ideas effectively with clients and stakeholders.
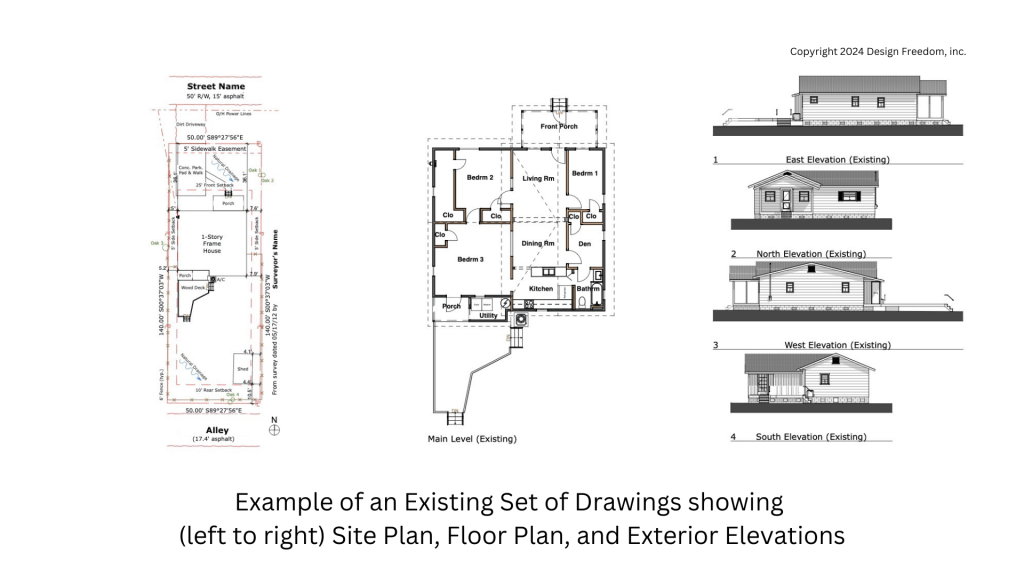
- Once we add the survey and our measurements to the CAD file, we will also locate the zoning setbacks and other items. At this point, we share the documented information with the Homeowners with an Existing Set of drawings and 3D images. These are good for comparison once we start design later.
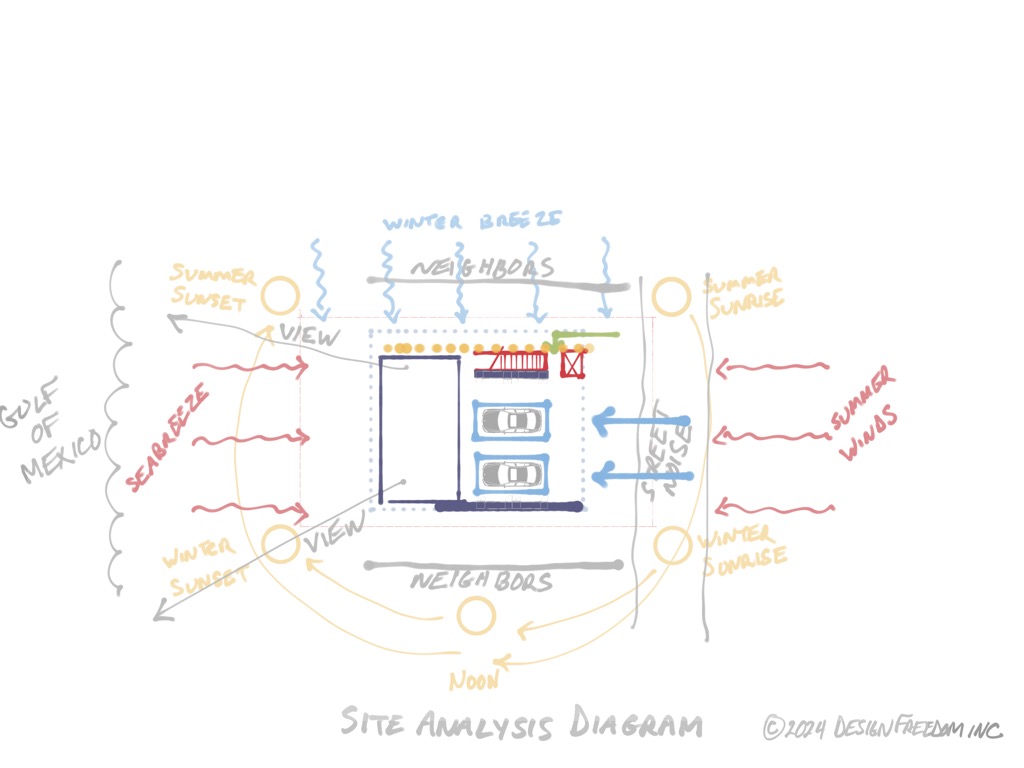
- Site Analysis Diagram: We don’t always show our Homeowners the other basic drawing used to create a design. Usually sketched out on paper, referred to during design, and later put away in a file folder, the Site Analysis Diagram is integral to “being” on your property without visiting it all the time. It serves as a reminder of where the sun rises, shines, and sets over your property, the direction of nice breezes and humidity-pushing winds, views, neighbors, etc.
In short, the Architectural Pre-design Phase lays the groundwork for a successful architectural endeavor, providing a solid foundation upon which creative vision can flourish. By meticulously navigating building codes, capturing client aspirations, understanding site conditions, and leveraging digital tools, architects set the stage for a seamless transition from conceptualization to realization. Ultimately, it is this meticulous attention to detail and holistic approach that paves the way for architectural excellence and client satisfaction.
Reach out if you would like us to help bring your vision to life!

One thought on “Your Blueprint to Success: A Guide to Architectural Pre-Design”